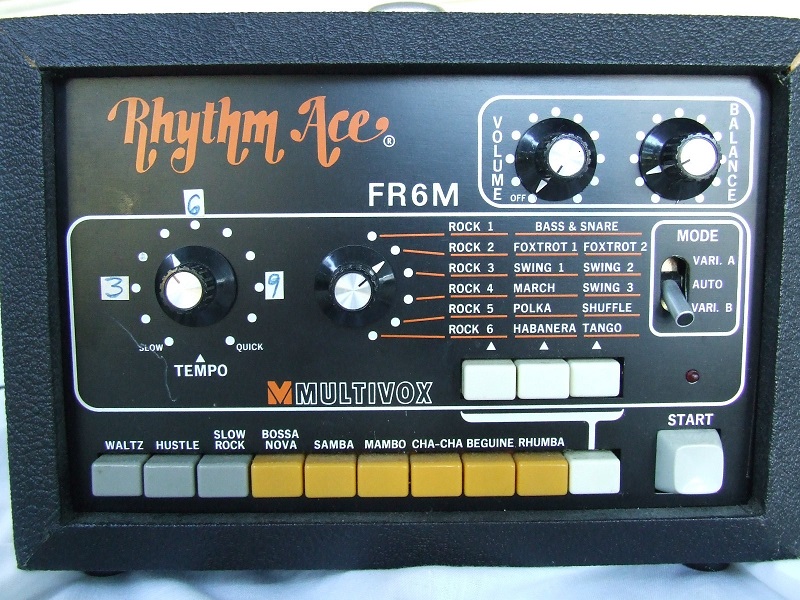
Turns out the FR6M is not at all similar to the Ace Tone FR-6. Amazingly jlo form the Muffwiggler forum has figured out how to trigger and sync the FR6M.
See his post here (scroll down a bit)
Turns out the FR6M is not at all similar to the Ace Tone FR-6. Amazingly jlo form the Muffwiggler forum has figured out how to trigger and sync the FR6M.
See his post here (scroll down a bit)
The amazing audiowerkstatt tools are now available in the Tubbutec shop and can be purchased in combination with Tubbutec products.
HiRes is an upgrade for the ModyPoly which adds high pitch resolution, microtuning and portamento. It works for Polysix and Mono/Poly
This is a short manual on how to replace the Minerva mod for Juno-60 with the Juno-66. A few people have asked about this and we finally got the chance to perform the conversion.

It is fairly simple and straight forward:
Merry Christmas and a happy new year!
We’ll be closed for 2 weeks until the 2nd.
Last day of shipping is this Thursday the 19th. We will of course accept orders after that, but these will be shipped on the 2nd next year.
Please understand that there will only be limited support during our absence, but we will of course be back for you next year.
Have a nice time and enjoy the Holidays !
This manual shows how to install uniPulse in a Korg MiniPops 3 (aka Univox SR-55 and Aria Diamond) and trigger all 9 instruments via midi.
The installation is fairly simple and only requires soldering a few wires and parts into place, as well as drilling a hole for the midi socket.
This manual describes how to add midi control to this drum machine using our uniPulse interface.
The machine has been sold under various names including
All 10 instruments can be triggered, most are velocity sensitive.
Installation of the midi interface is quite simple and only requires soldering a few cables and drilling a hole for the midi socket.
The picture below shows where to connect the 10 trigger outputs from uniPulse (P1-P10). Just solder directly to the existing solder points.

The next picture shows where to connect +V and GND wires that power the uniPulse.

And finally here you can see how we mounted the uniPulse board using double sided tape. The midi socket can be installed in the back of the machine, a drilling stencil is provided.

As a last step you need to upload the uniPulse configuration using our config tool. Config file here (right click, save as).
You can order uniPulse in our shop (you need the ‘normal version’ here)
Due to the COVID-19 epidemic, schools and kindergardens are currently closed in Berlin.
As a result Tubbutec staff will spend more time at home and less at work. Production of synth mods is slowed down, but not halted and we have considerable stock of most products. We therefore decided to keep the shop open, but only ship once a week until further notice.
Mod installs, repairs and other service will halt until at least the mid of April.
Support will continue as time allows
thank you very much for your understanding
-Tubbutec Team

Some users of our µTune eurorack quantizer and midi interface have asked if about the Colundi scale and how to use it with µTune.
Here is a quick tutorial how to set it up.
The Colundi Scale is somewhat different from traditional scales in that it consists of absolute pitches, rather than relative intervals.
There are different Colundi scales, in this tutorial we will use the list published here:
http://colundi.net/data.php
The scl. file we created using these frequencies can be found here:
Colundi scl file
Update: Here is the scl-file for the complete final list with 128 frequencies:
Colundi-full-everyOne.scl
At the end of this tutorial, we will show how to create such a scale file yourself.
Using the Colundi scale file is pretty simple with µTune. This explanation might look complicated, but it is only very detailed.
As you can see, the first frequency is 10.8Hz, followed by 33Hz, 33.8Hz, 55Hz,…
We now have to convert these frequencies into ratios based on the base frequency and calculate the difference in cents.
By the time of writing this, in Scala you can enter the frequencies directly, Scale workshop does currently not support this however. A simple Excel script can do the job for you as well.
Our base frequency fbase = 10.8Hz which we define to be 0 Cent.
The cent distance from our base frequency can be calculated as:
cent = 1200 × log2 (fn / fbase)
The cent value of out next frequency f1 = 33Hz can therefore be calculated as:
cent1 = 1200 x log2 (33Hz / 10.8Hz) = 1933.72165 Cent
The next entry in our scale is:
cent1 = 1200 x log2 (33.8Hz / 10.8Hz) = 1975.19032 Cent
ans so on.
When you are done you can use your list to create an .scl file. You can do so using Scala, Scale Workshop, µTune’s scale editor or a simple text editor. The .scl file format is very simple and described here.

One of our customers, Landon Balk, used the uniPulse midi interface to add midi to his Boss DR-55.
He also completely modded his machine and constructed a custom case.
You can purchase the case directly from him: facebook site or website.
This manual shows how to install uniPulse in the Boss DR-55 based on his instructions.
Please read carefully before purchasing the uniPulse mod. If you want this to be done by a tech, get a quote first!
Unlike most other drum machines the DR-55 needs to be modified a bit before uniPulse install is possible. The modification consists of replacing four jumper wires with diodes. You can use pretty much any kind of diode like 1N4148.
Modifications Boss DR-55
It will be hard to fit the uniPulse board in the original case. An external case like this one is probably a good choice. Here you can see the uniPulse board (on the right) sitting in the case and wires connected to the DR-55 main board.

A close-up shows where to solder the wires from uniPulse. Wires marked 1-5 are pulse outputs P1-5 from the uniPulse.The 5th connection is an extra sound (just the snare ‘body’)

Powering uniPulse
We recommend to power uniPulse from an external 12V-15V DC power supply. Just make sure to connect GND of uniPulse to GND of the DR-55
You can use the uniPulse configurator to upload your configuration. You need to set up the Pulse outputs as: Positive, Rect, 6V. Linking the velocity to the voltage will give you some velocity control. We recommend to experiment with pulse shapes and lengths.
You can find a configuration file here
This manual describes how to install uniPulse midi in a Roland PB-300.
You will get direct control over the drum sounds and trigger them in a velocity sensitive way.
After installation, you will be able to trigger the following sounds:
Kick, Snare, Low Tom, High Tom, Closed Hihat, Open Hihat, Rimshot and Cymbal
These instructions are based on information from forum user nutjob in the thread over at MuffWiggler
Thank you very much.
Installation is very simple. Just solder the wires from the uniPulse to the PB-300 board as shown in the picture below. If you want to continue using the existing midi, you need to drill a hole for an additional midi socket using the stencil provided in the kit. Otherwise you might be able to disconnect the existing socket and solder to it directly.


After installation turn on the machine. The led on the uniPulse board should light up and you are ready to transfer the config file to it using the configurator.
The config file can be found here (you need to unzip it):
<iframe width=”560″ height=”315″ src=”https://www.youtube-nocookie.com/embed/s-HSwY5y41k” frameborder=”0″ allow=”accelerometer; autoplay; encrypted-media; gyroscope; picture-in-picture” allowfullscreen></iframe>
In depth review of Tubbutec µTune and expander by Synth DIY Guy
.
He used the Linnstrument in MPE mode to microtonally control his modular setup and show a lot of µTune’s features.
Acid Jam Session using Eurorack for the Acid sound and Bassdrum.
A Beatstep Pro syncs a Roland TR-505 and A Korg SQ-1 using Tubbutec USB Bridge A.
A second USB Bridge A is used to connect a USB midi keyboard directly to the Novation Peak.
This is how to open our Firmware updater utility on OSX. This should work with any other unsigned app as well. This has been tested with OSX Big Sur but probably works with older OSX versions as well.
Download the app. Safari will place it in the Dowload folder. Navigate to the Download folder in Finder.
Right click on the file and select “new Terminal at Folder”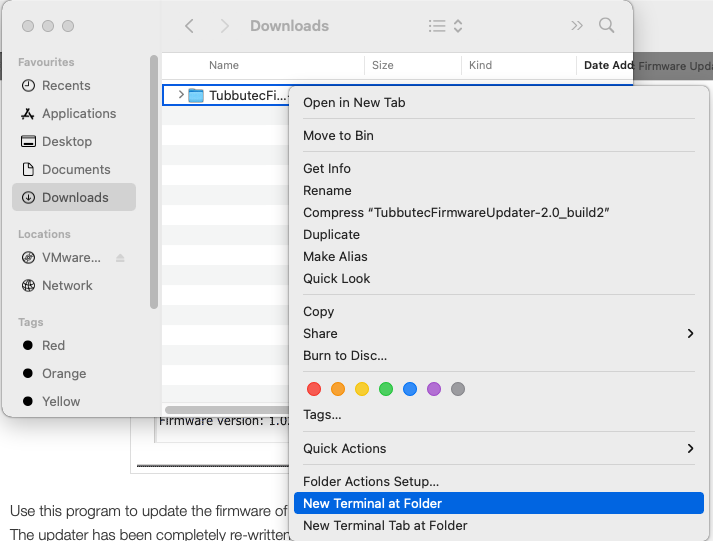
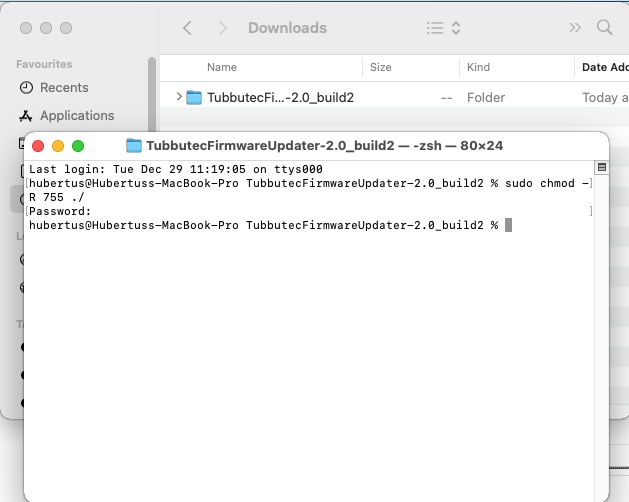
A terminal window opens. Type the following command: (you can copy and paste it here)
sudo chmod -R 755 ./
You will be promted for your password. Enter your password – it will not be visible. After entering your password press enter.
Open the folder with the little arrow on the left, right click on the “Tubbutec Firmware Updater” application and select “Open”
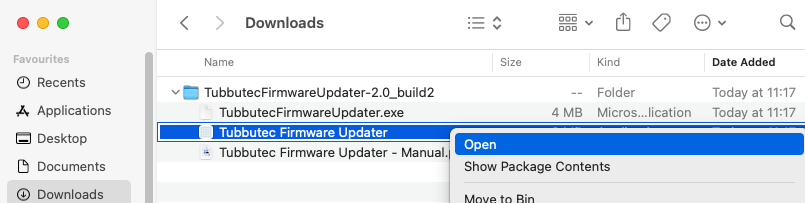
You will see a message that the file can not be opened. Click Cancel.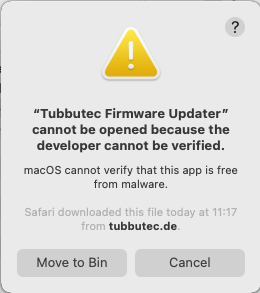
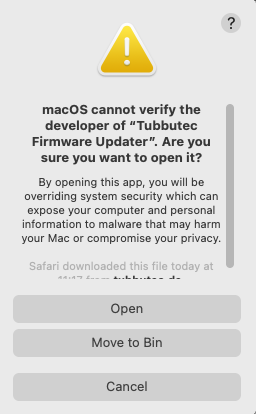
Repeat step 3! The second time you click open, the following window will appear.
Click Open and the app will start 🙂
The incredible Sunshine Jones took our Juno-66 user manual, improved the design and added more info for clarity.
The result can be found on his website. There is also a nice cheat sheet you should not miss.
Additionally he made a few short video demos of specific Juno-66 demos:
Arp and Powerarp
Chord Memory and Polychord
This manual describes how to install our uniPulse midi retrofit in a Hohner Automatic Rhythm Player.
After installation you will be able to trigger all 10 sounds, most of them fully velocity sensitive. You will not be able to sync the internal rhythms to midi clock however.
Installation is fairly simply and requires you to solder 10 wires from uniPulse to points on the Rhythm Player voice board. These are P1-10 and CV (as labelled on the back of the uniPulse board). The black P7 wire is not used.
Unplug the machine, remove the slotted screws and open it. Then solder the wires as shown in the following pictures. The “CV” connection used for the Maracas needs an additional diode. Any Diode is fine here. As you can see, the cathode of the diode (marking) connects to the cathode of the existing diode.
In order to install the midi socket you need to drill 3 holes. A stencil for drilling is provided. For the large hole you can use a stepping drill. Now mount the socket using the screws provided.
You can mount the uniPulse board anywhere in the machine. We decided to use thick double sided tape to mount it on the rear. Make sure the board can not short to the metal chassis.

After installation, plug in the machine and turn it on. The LED on the uniPulse board should light up indicating proper power connection. Using the uniPulse configurator tool, upload config file for the Hohner Rhythm Player (zipped, extract before opening in the configurator)
That’s it! have fun!
Our uniPulse universal midi interface can be installed in a Roland CR-68 and will add the following features:
– Velocity sensitive trigger of all instruments
– Global Accent trigger with the existing accent amount control
– Midi clock sync and start/Stop
[Video coming soon]
After installation the following midi instruments are available on midi channel 10. The channel and midi numbers can be changed using our config tool (see the installation manual below)
Accent 34
Bass Drum 35
Rim Shot 37
Snare 38
Maracas 42
Open hihat 46
Cymbal 49
High Bongo 60
Low Bongo 61
Low Conga 64
Claves 75
All of these sounds are velocity sensitive, some instruments however (such as the hihat and cymbal) react to velocity rather poorly. You can hear all instruments near the end of the demo video above.
In addition to this velocity sensitivity, a global accent can be triggered via midi note 34. The amount of this accent can be adjusted with the ACCENT knob on the CR-68
With the switch on the back, the original internal clock, or midi clock can be selected as clock source.
The installation requires to solder some wires to points on the CR-68 board, and holes for the midi socket and clock switch need to be drilled. A stencil for drilling is provided.
For clock sync installation. two traces on the board need to be cut, this is easy to fix should you decide to remove the kit at some point.
The installation manual and config file is available here.


